Summer's first harvest

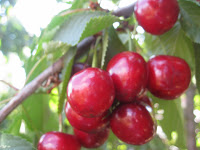
In June the arrival of the plump, sweet dark red cherries marks the beginning of summer fruit. Cherries have a short picking season of about 4 weeks, so you have to act quickly and get them while they are ripe! There are many cherry farms in Southern Ontario, but why pay for fruit when you go to your backyard and pick them? Many, many years ago, my family decided to buy some cherry trees and enjoy some locally grown fresh fruit.


But, the only problem with cherries is that they have an extremely short shelf life and need to be consumed or used relatively quickly. So what do you do if you want to enjoy cherries all year round? There are several ways to perserve the cherries for later use: freezing, dehydrating and canning. Personally, I prefer to freeze my cherries either pitted or in a pre-mixed cherry pie filling.

Now before you can prepare the cherries, you must have one key tool on hand.....the cherry pitter. It basically looks like a mini hole puncher for cherries and it is the only way to unpit a cherry......without eating it!

Freeze pitted cherries.
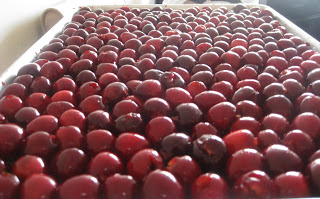
1. Wash cherries and unpit........warning do not wear white, cherry juice is harder to get out than red wine!

2. Place cherries in one layer on a cookie sheet and place in the freezer for at least an hour.
Note some people say that rolling your cherries in sugar and freezing them preserves them longer, but I can never get my stock to last very long and I don't like to sweeten my fruit before I add them to recipies, so I don't recommend this.

3. Once the cherries are frozen place into ziploc bags or containers for future use!


Freeze cherry pie filling

2 pounds of sweet (Bing) cherries pitted and halved and their juice
1/2 cup granulated sugar
2 -3 tbsp cornstarch
zest of 1 large lemon

1. Wash, pit and halve the cherries, reserving the juice. Place in a large mixing bowl
2. Add sugar, lemon zest and 1 tbsp of cornstarch. Stir.

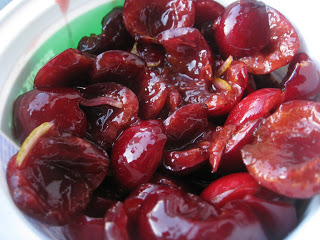
3. Add more cornstarch depending on the amount of juice reserved. You want the pie filling to look thick and glossy.

4. Pour into a container and freeze.

When you are ready to use simply defrost and use with your favourite frozen or homemade pie crust!

Bon Appétit

A Good Olde Fashioned Crab Boil

Mmm....Crab Boil. If you ever get invited to a 'boil', accept immediately. A boil is classic Southern tradition, where large quantities of crawfish, crab, shrimp, sausage, corn and potatoes are boiled in a pot with a spicy blend of herbs. The perfectly seasoned food is then strained and laid out on a newspaper in front of the hungry guests. Trust me, the newspaper is a key component as boils are a messy affair!

As a previous Atlanta, Georgia resident, I suffer from extreme Southern cuisine withdrawal, so you can imagine my excitement when my friend Brandon call me up and invited me over for a crab feast. Now Brandon, bless his heart, was planning on just boiling the crab in regular salted water and eating them with butter, clearly I had to intervene. Luckily I still had a box of Zatarain's crab boil seasoning from my last visit to Atlanta! Yes, you could make your own crab boil seasoning and there are lots of good recipes out there, but Zatarain's has been around since 1889 and has practically perfected it.

So I packed my trusted oversized pot (40 quarts - basically twice the size of your standard pasta pot) and Zatarain's and made my way over to Brandon's place. Boils are great because they are so easy to do, there are basically only 4 steps:

1. Filled the pot 3/4 with water, add 2 tbsp of salt, boil seasoning package (Zatarains') and bring to a rolling boil. Note - if you like things a bit spicier, add 1 tbsp of cayenne pepper or chili powder to the mix.

2. While its boiling - wash and prep the corn/potatoes. I usually leave the potatoes whole if you get the small round ones, just make sure you give them a good scrub. As for the corn, cut each ear of corn into half or thirds.

3. Once the water is boiling, add your washed seafood (crab, crawfish, shrimp), corn/potatoes. Note - crab, corn and potatoes take about 5 minutes to cook, but shrimp takes less time (about 1 minute) so you should add this near the end.

4. Once it is done, turn the stove off and let the seafood stand in the pot for about 5-10 minutes, so the flavours can really seep into the food. Then, drain and serve. For those of you who don't enjoy picking out crab meat, you can add 1-2 tbsp of vinegar to your boil and it will make the meat pull away from the shell, making it easier to pick out.

Here's a picture of our massive crab boil.....I confess we had a very high proportion of crab to everything else, but isn't that the best part anyways?
Suffice to say 6lbs of Alaskan King Crab legs, 4 ears of corn, a case of beer = the best summer backyard meal. Several days later, I find my self still dreaming about the sweet but slightly spicy succulent crab meat. I might just need to have another boil before this summer is over, I'm sure my roommate Michael won't mind at all.

A Promise

Welcome everyone! They say the best way to make sure you accomplish your goals is to write them down, because it makes you accountable. After years of supportive 'pushing' by my friends (thanks Pinchy, desa, steph, krissy, ne-po, CT, hita & hobo) I've decided to pursue my love of food more seriously. At this point, I'm not sure where my food journey will lead me, but I sure it will involve many culinary experiments in my own kitchen, travelling to other countries to experience things first hand and hopefully some actual professional training as well.

Thanks again for stopping by and I hope you find my food adventures appetizing and entertaining!