So here I am in London, bedridden, feverish, no voice, inflammed throat and fits of coughing, whatever is a girl to do. As I am regularly asked for restaurant recommendations, I decided to put my sick day to good use and start to write them all down. Since I have New York on my mind these days I will start there. Happy reading!
Thanksgiving - It's Turkey Time
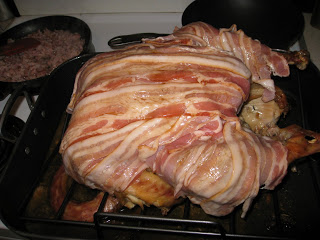
A good friend of mine requested my maple bacon turkey recipe, so I figured this was a sign from the blogging gods that I need to make a post. Now, the key, in my opinion, to a juicy turkey is a brine. For the record, dry turkey should be a crime punishable by death, so in order to avoid this, you should give brining a try.
Brine
Brine

Slap in the face
Today was a reality check, Chef Will, who I love, decided to close today's class with a heartfelt personal version of the down and dirty truth on the restaurant industry.
- we will be paid next to nothing
- we will work 60 -80 hrs/week
- we should try to find other sources of income, catering etc
- our family and friends may disown us or think we have been kidnapped
- women are not treated well in kitchens
- everyone on the line, will be 18 -19 yrs old, who can work faster, longer and stronger
- working in the kitchen may drive you insane
- working on the 'line' for more than 10 years will kill you
I would honestly say that many of the above could be used to describe the life of a Chartered Accountant, except for the one about the pay. All the same, it is a reminder of the stark reality of the industry. For me, it was just a reminder but looking around the room at the horrified gaping faces of some of my classmates, it was clear that it was new information for some.
I guess there is a reason why Chef Will was not on the agenda at orientation, perhaps it would send propsective students fleeing out the door before the check cleared on their first tuition payment. But on the other hand, I think everyone deserves to know exactly what they signed themselves up for.
Not everyone is cut out for the intensity of culinary school or the restaurant world. Now, I am not saying that you have to want to be a restaurant cook to be here at school, some of the best students in class want nothing to do with a restaurant kitchen, but you should know what you want to get out of this, or at least that my two cents.
For me, the slap in the face is a timely reminder that the road I have chosen is not going to be easy, it will be physically and mentally demanding, it will require the endless understanding of my family and friends, it will mean the loss of all weekends and holidays and it may very well bankrupt me. But what I know is that I feel more alive after 6 hours of standing, sweating and cooking than I have ever felt in my life. Besides, I love a good challenge and I have never stepped down from a fight, so I say, bring it on.
Hello again...
Despite my best efforts to fastidiously update my blog, I have failed miserably. Class is intense and I am usually so focused on the task at hand that I never remember to take pictures of the delicious dishes we create, and without pictures how can I have a blog entry. At least this is how I justify it to myself, sad I know.
However, luckily one of my class mates is a much more dedicated and talented blogger, so you can catch a glimpse into my life here at the FCI through their blogs
http://bluesoupblog.wordpress.com/
Now, this is not the white flag of defeat, I will continue to blog about my adventures.
However, luckily one of my class mates is a much more dedicated and talented blogger, so you can catch a glimpse into my life here at the FCI through their blogs
http://bluesoupblog.wordpress.com/
Now, this is not the white flag of defeat, I will continue to blog about my adventures.
holy cow
Most of us do not buy a whole beef tenderloin and then trim it ourselves. Luckily at school, we have Chef Rogers to teach us how to do it. I actually got to trim one tenderloin myself and here's what it looked like:
On the far end - scraps, which can maybe be used to reinforce a stock or garbage. Left hand side - the long piece of meat on the left hand side, a properly trimmed beef tenderloin, probably big enough to cut 20 fillets out of. Bottom right - good quality tenderloin meat, but not big enough to cut a fillet, can be minced and made into steak tartar

For those of you who are curious there is a great video that show you how to clean and trim a tenderloin on you tube.
On the far end - scraps, which can maybe be used to reinforce a stock or garbage. Left hand side - the long piece of meat on the left hand side, a properly trimmed beef tenderloin, probably big enough to cut 20 fillets out of. Bottom right - good quality tenderloin meat, but not big enough to cut a fillet, can be minced and made into steak tartar
For those of you who are curious there is a great video that show you how to clean and trim a tenderloin on you tube.